Brush lettering is one of the most captivating arts in the creative world.
But what exactly is brush lettering, and how can you master it?
This brush lettering tutorial will guide you through all the essential steps, tips, and tricks needed to create stunning calligraphy.
Some are beginners trying to understand the basics of brush pen control.
Some are intermediate artists struggling with stroke consistency.
Some are creative entrepreneurs wanting to monetize their skills.
Some are parents seeking fun ways to spark creativity in their children.
Let’s dive right in.
What Is Brush Lettering and Why Should You Learn It?
Brush lettering is a style of calligraphy created using flexible brush pens or brushes. Unlike standard writing, it emphasizes varying stroke widths—thick on downward strokes, thin on upward strokes—giving letters a graceful and artistic flow.
This modern calligraphy style invites artistic expression and personal flair with every letter you create. It’s a versatile skill useful for card making, journaling, signage, and professional branding.
What makes brush lettering stand out is the live feel of pen pressure and the organic stroke transition that mechanical fonts lack. It’s a craft that challenges and rewards your control and creativity.
Whether you’re starting fresh or honing your writing, mastering brush lettering enhances fine motor skills, patience, and artistic confidence.
Essential Tools for Starting Your Brush Lettering Journey
Before you pick up your brush pen, it’s important to understand the tools that will make or break your experience.
Brush pens vary widely. There are large, medium, and small brush tips, each suited to different projects and hand sizes.
Large brush pens produce bold strokes perfect for signs and posters but require more space and control. Smaller brush pens give delicate lines ideal for journals and envelopes.
Flexibility and the pen’s spring-back response affect how easily you can create consistent thick and thin strokes.
Among popular brands, pens like the Tombow Dual Brush Pen or Pentel Touch offer smooth ink flow and flexible tips that are beginner-friendly.
But remember: the best brush pen is often the one you already have. Learning your tool’s quirks helps build mastery faster than always switching pens.
Paper quality also matters. Thick, smooth paper resists ink bleed-through, allowing crisp, clean strokes. Avoid ultra-thin paper unless you prefer watercolor-style bleeding effects.
Experimentation will guide you to your perfect tool and workspace setup.
How to Start Brush Lettering: Basic Techniques Explained
Brush lettering revolves around the simple rule: downstrokes are thick, upstrokes are thin. This fundamental principle is the cornerstone of elegant calligraphy.
Let’s break it down step by step:
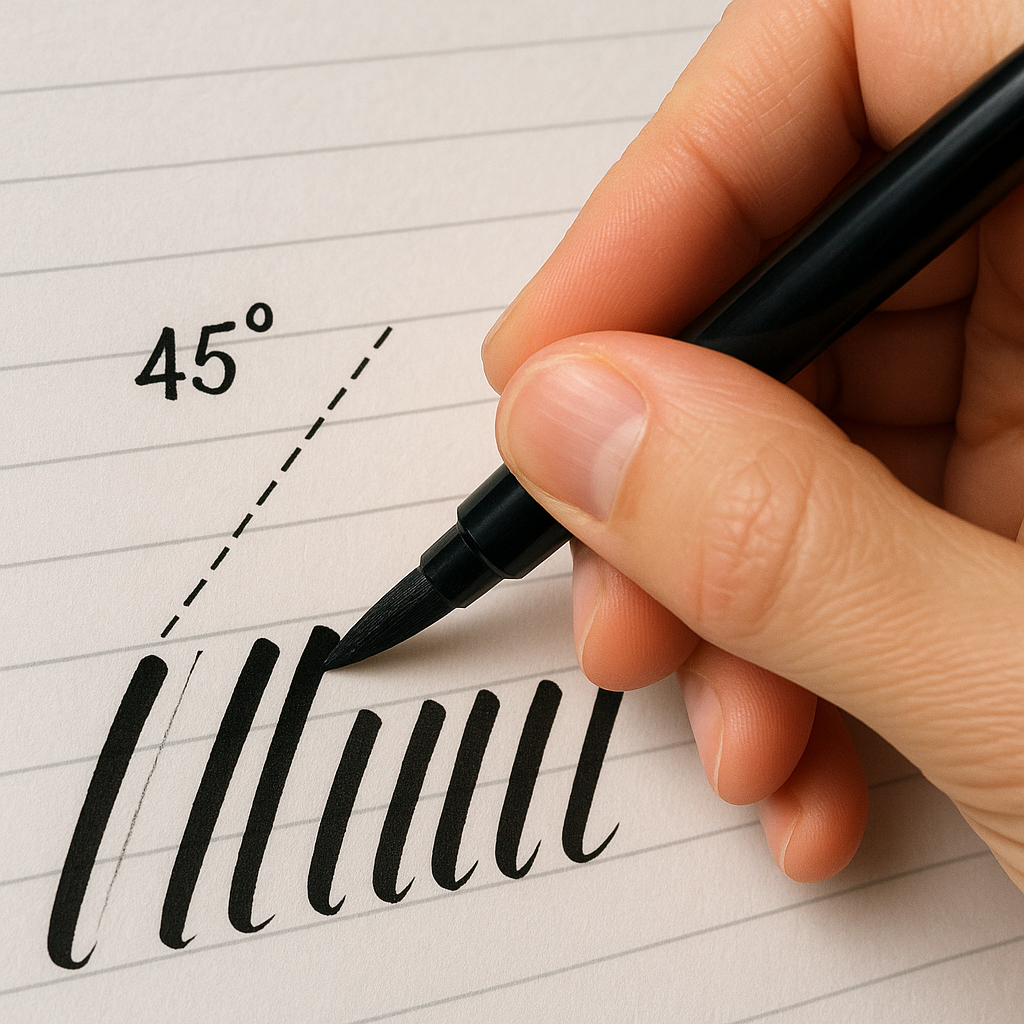
- Hold the brush pen at about a 45-degree angle. This positioning minimizes the “tip flip” problem where the pen unintentionally flips and creates messy strokes.
- Apply firm pressure on downward strokes. Push the brush tip to spread the bristles slightly, creating thick lines.
- Lift pressure for upward strokes. Use just the tip of the brush with light pressure for thin, delicate lines.
- Practice smooth transitions. The transition between thick and thin must be gradual with no abrupt jumps in pressure.
- Lift the pen after each stroke. Unlike regular writing, brush lettering involves deliberate pen lifts to control stroke shapes and spacing.
Practice these strokes individually: upward thin strokes, downward thick strokes, curves, and ovals until comfortable.
This approach is similar to learning to play a musical instrument where muscle memory develops over time.
Avoiding Common Brush Lettering Mistakes
Every beginner hits snags. The most frequent brush lettering issues include:
- Tip Flip: The pen flips over instead of gliding smoothly. This is often due to holding the pen too vertically.
- Soggy Bottom: This occurs when pressure is not released gradually on ovals or loops, causing uneven thick lines at the bottom.
- Gap Top: A small gap forms at the top corners of strokes when you move too quickly, missing smooth curves.
The solutions often relate to pen angle, pressure control, and speed. For example, holding your pen at about a 45-degree angle prevents tip flips, and slowing down your strokes ensures seamless curves.
Regular practice with mindful technique adjustments will greatly reduce these issues, making your lettering clean and polished.
How to Choose the Right Brush Pen for Your Style
Choosing a brush pen depends on your preferred lettering style and projects:
| Pen Size | Best For | Typical Brand Examples | Advantages |
|---|---|---|---|
| Small Brush Pens | Journaling, envelopes, detailed work | Pentel Touch, Tombow Fudenosuke | Greater control, easy for beginners, crisp thin lines |
| Medium to Large Brush Pens | Signs, greeting cards, expressive lettering | Tombow Dual Brush, Pentel Sign Brush | Bold strokes, vibrant ink output, dynamic range |
Other considerations include ink color options, pen grip comfort, and paper compatibility.
For instance, the Sharpie Stain brush pen has rich black ink but limited color range and may bleed on thin paper, while Pentel pens offer a spectrum of vibrant colors suitable for art journaling.
Always test pens on your preferred paper to avoid unwanted bleeding or feathering effects.
Practical Brush Lettering Exercises to Build Your Skills
The path to beautiful brush lettering is paved with consistent practice.
Try these exercises daily for progressive improvement:
- Basic Strokes Sheet: Repeat upward thin strokes, downward thick strokes, curves, and ovals.
- Alphabet Practice: Start with lowercase letters focusing on stroke consistency and spacing before moving to uppercase.
- Word Formation: Write short words, observing pressure control and pen lifts between strokes.
- Transitions Practice: Combine thick and thin strokes smoothly within letters.
- Brush Pen Control Drill: Use dots and lines to improve finger and wrist strength.
Each of these drills strengthens your muscle memory and improves the uniformity of your brush lettering.
Remember, progress takes time. Celebrate small wins—every cleaner stroke is a step closer to mastery.
Ready to See Brush Lettering in Action?
Watch this quick, expert-led demonstration that shows how to control thick and thin strokes with a brush pen, perfect for beginners.
How Can I Practice Brush Lettering Effectively?
Effective practice combines focus with fun. Instead of endless repetition, break your sessions into manageable chunks—like 15 minutes focusing on strokes, then 15 on letters.
Add variety by experimenting with different quotes or holiday greetings to stay motivated.
A creative community or class offers feedback and accountability, speeding your journey. At CreativiU, our brush lettering courses emphasize incremental goals and enjoyable learning to boost both skill and confidence.
Beyond just practicing, reflecting on your progress every week reveals growth and challenges, a vital component to keep your motivation high and identify areas needing improvement.
What Are Some Advanced Brush Lettering Techniques?
Once you’ve mastered basics, try adding flare:
- Bounce Lettering: Vary the baseline for playful, dynamic compositions.
- Shadowing and Highlighting: Use dual tones or white gel pens for depth.
- Blending Colors: Layer colors while wet to create gradients and ombre effects.
- Flourishing: Extend strokes with delicate swirls for elegance.
Each advanced technique demands patience and practice but dramatically transforms your lettering style.
Try combining these techniques to create unique projects such as personalized cards, invitations, or logos that reflect your artistry and brand identity.
How Can I Fix Streaky or Uneven Strokes in Brush Lettering?
Uneven ink flow can be discouraging, but is fixable with these tips:
- Pen Storage: Store pens horizontally to avoid ink pooling.
- Paper Choice: Use smooth, bleed-resistant paper to prevent streaking.
- Pressure Control: Avoid pressing too hard or too lightly; consistent pressure yields even strokes.
- Stroke Speed: Slow down your strokes for ink to flow evenly and avoid “gap tops” or blotches.
- Pen Condition: Replace worn tips as they affect ink delivery and consistency.
Avoid rushing; brush lettering rewards slow, deliberate practice.
Fixing these common issues leads to polished work and renewed confidence.
How Do I Choose the Best Paper for Brush Lettering?
Paper quality changes everything. Ideal paper has:
- Smooth surface: Reduces pen tip wear and ink feathering.
- Thicker weight (90gsm+): Prevents bleed-through.
- Grid or dot guides (optional): Helps maintain consistent letter sizing and alignment.
Fine art papers like Rhodia or marker pads are popular among calligraphers.
Test different types to find one that feels right with your brush pen.
Are you surprised by how much paper choice affects your lettering?
Remember: the right tools make a world of difference in your brush lettering journey.
Creating Beautiful Projects with Your Brush Lettering Skills
Brush lettering shines in countless creative projects:
- Greeting Cards: Personalized messages with swirled details.
- Invitations: Add artisanal charm to weddings or parties.
- Journals & Planners: Beautify daily entries with calligraphy headers.
- Branding: Unique logos and packaging designs.
- Wall Art: Inspiring quotes or names rendered elegantly.
Combining brush lettering with complementary arts like watercolor or stamping creates truly bespoke pieces.
Exploring these applications can turn a simple hobby into a profitable or deeply fulfilling creative career.
How Can You Advance Your Brush Lettering Skills Further?
Leveling up involves continued learning:
- Join workshops and online courses that focus on refining technique.
- Engage with the creative community to exchange ideas and feedback.
- Challenge yourself with themed projects and real-world applications.
- Explore cross-disciplinary skills like digital lettering tools for hybrid media creativity.
For example, CreativiU offers expertly designed courses that help artists unlock their potential through structured practice and supportive communities, blending creativity with effective learning.
Looking for structured learning? Check out this guide to enhance your creative problem-solving skills alongside brush lettering—an invaluable advantage for any artist or entrepreneur.
Frequently Asked Questions About Brush Lettering
- What’s the best way to hold a brush pen?
- Hold it at about a 45-degree angle with a relaxed grip, allowing natural pressure control to create thick and thin strokes.
- How long does it take to learn brush lettering?
- With daily practice, beginners see noticeable improvement within weeks, but mastery is an ongoing process that spans months or years.
- Can brush lettering be done on any paper?
- Technically yes, but smooth, medium-to-heavyweight papers prevent bleed-through and prolong pen tip life for better results.
- Do I need expensive brush pens to start?
- No. You can begin with affordable brush pens you already have. Learning your tools is more important than expensive materials.
- Is brush lettering the same as calligraphy?
- Brush lettering is a modern form of calligraphy using brush pens, emphasizing pressure-based strokes. Traditional calligraphy often uses dip pens and has different techniques.
What’s Your Next Step?
Tell us in the comments: How will you apply this to your brush lettering journey? For personalized advice and more creative inspiration, explore our wide range of arts and crafts resources!
Remember, every artist’s path is unique. Whether you create for joy or profit, brush lettering offers endless opportunities to express creativity and refine skill.
Ready to pick up your brush pen and start lettering beautiful designs? Let this detailed tutorial be your trusted companion.
Leave a Reply