Finding a real professional leather tooling course online can feel like hunting for a needle in a haystack. Most classes promise skill but deliver basics. This guide shows you how to cut through the noise, match your goals, and land a course that truly builds a career‑ready skill set.
You’ll walk through goal setting, curriculum checks, instructor vetting, platform comparison, review reading, and enrollment tactics. By the end you’ll know exactly what to look for and feel confident to sign up.
Step 1: Define Your Leather Tooling Goals and Skill Level for a Professional Leather Tooling Course Online
First, ask yourself why you want to learn leather tooling. Is it a hobby that you want to turn into a side hustle? Or do you aim to work for a brand that makes bags, belts, or saddles? Your answer will shape the rest of the hunt.
Write down a clear learning outcome. A good outcome follows the SMART rule , it’s specific, measurable, achievable, relevant, and time‑bound. For example: “By the end of the course, I will stitch a leather wallet with three different tool marks and finish it with edge paint, measured by a final photo review.”
Designing outcomes helps you match the course to what you need. Missouri Online explains that clear outcomes guide curriculum and assessments. Use that tip to audit any course description you read.
Next, gauge your current skill level. Are you a total beginner who has never touched a swivel knife? Or have you already made a few simple bags and need to learn deeper embossing techniques? Most online classes label themselves as “Beginner” or “Intermediate” , but the labels can be vague.
Here’s a quick way to self‑assess:
- Can you cut leather cleanly with a rotary cutter? , If not, you’re at the beginner stage.
- Can you set up a stitching pony and run a simple saddle stitch? , That’s intermediate.
- Do you know how to design a pattern, emboss a motif, and finish with edge paint? , That’s advanced.
Write your skill level in plain words. This will help you filter out courses that are too easy or too hard.
Bottom line: Clear goals and a honest skill audit keep you from wasting time on the wrong class.
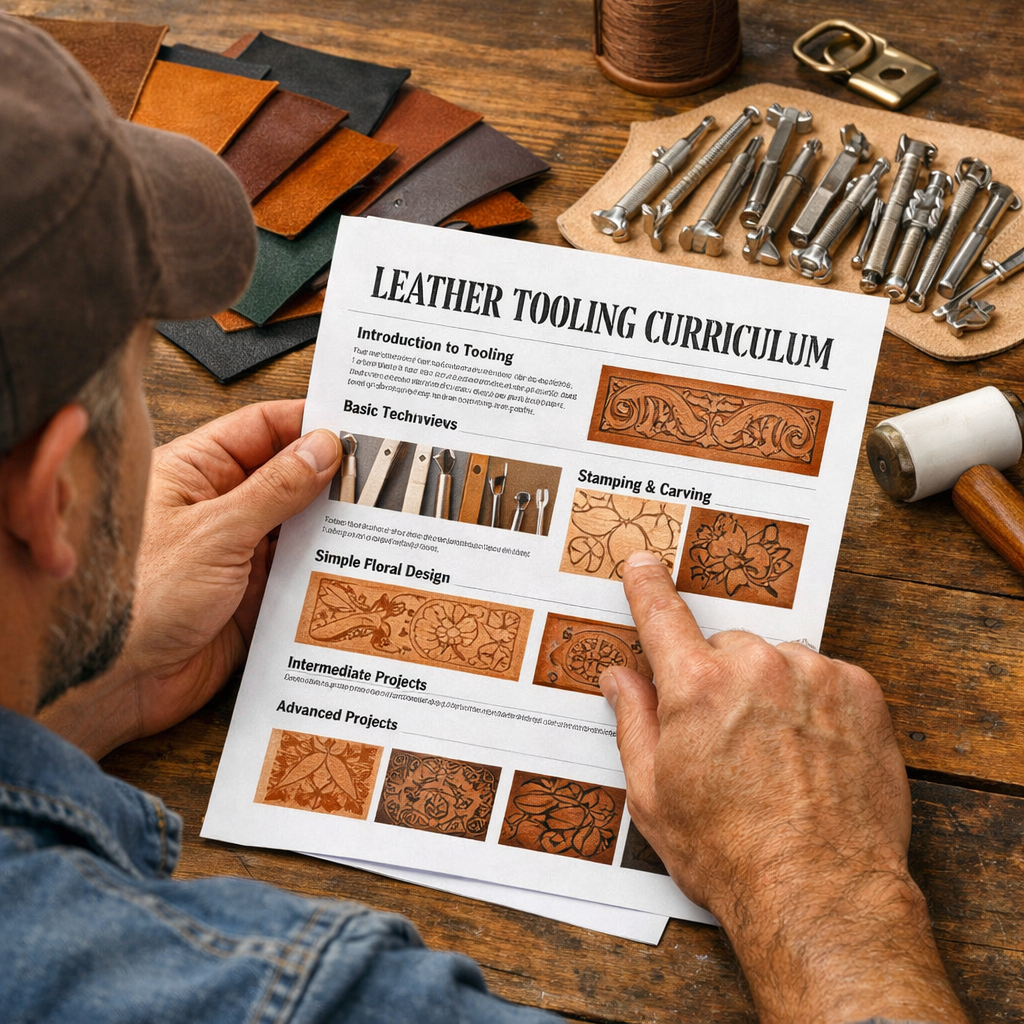
Step 2: Scrutinize the Curriculum and Projects for a Professional Leather Tooling Course Online
The curriculum is the heart of any course. A strong program will move you from simple cuts to complex embossing in a logical order.
Look for a syllabus that lists each module, the tools used, and the final project. A good course will break lessons into bite‑size videos, each followed by a practice assignment.
One red flag is a vague promise like “learn everything” with no detail. Instead, you want to see something like:
- Week 1: Leather basics , tools, safety, and simple cuts.
- Week 2: Stamping and basic tooling patterns.
- Week 3: Advanced embossing and edge painting.
- Final project: Build a leather satchel with three tool‑mark styles.
Check the course reviews for project depth. Student ratings on this site show most courses score 4.4 or higher, but look beyond the stars , read the comments about the actual projects.
The market is flooded with beginner‑only classes. If you need intermediate or advanced work, you’ll have to dig deeper. For a closer look at how a structured curriculum can be designed, see our practical guide to online pottery wheel classes, which follows a similar progressive module approach.
Ask yourself: does the curriculum include a final portfolio piece? Does it give a step‑by‑step PDF pattern you can download? These are signs of a serious program.
When you find a course that matches your goal list, move to the next step.
Bottom line: Verify that the curriculum maps directly to the skills you need for a professional leather tooling course online.
Step 3: Assess Instructor Expertise and Support for a Professional Leather Tooling Course Online
The teacher makes or breaks the learning experience. Look for an instructor who has real trade work, not just a YouTube channel.
Check their background. Do they list years of work in a leather shop? Do they show a portfolio of finished goods? A credible instructor will often mention awards, exhibitions, or long‑time teaching history.
One strong example is the Leathercraft Masterclass, which states it serves 85 countries and updates videos monthly. The site says students love the “proper teacher, you have given me confidence to overcome my fears” sentiment.
Beyond the bio, see how the instructor interacts with students. Do they offer live Q&A sessions? A private forum? Quick email replies? Those support channels are key when you hit a snag on a tricky tool mark.
Read the community feedback. If students mention fast responses and detailed critiques, that’s a good sign. If the only comment is “great videos” with no mention of support, you may be on your own.
While that quote is about SEO, the idea applies: start early and get help fast.
Bottom line: Instructor expertise and responsive support are must‑haves for any professional leather tooling course online.
Step 4: Compare Online Learning Platforms for a Professional Leather Tooling Course Online
Not all platforms work the same way. Some charge a one‑time fee, others run a monthly subscription. Some host live classes, others only on‑demand videos.
Here’s a quick decision matrix that looks at the most common features:
When you compare, think about what matters most to you. If you need live feedback, a platform with weekly Zoom is best. If you prefer a low‑cost entry, a $1 trial is a great way to test. CreativiU, for instance, offers its pottery wheel classes with similar community features, as detailed in our practical guide to online pottery wheel classes.
SelectYourUniversity breaks down fee ranges and course lengths for leather design courses. It notes that most platforms charge between ₹5,000 and ₹50,000 (roughly $60‑$600) and offer courses from 3 months to a year.
Bottom line: A side‑by‑side feature table helps you see which platform fits your professional leather tooling course online goals.
Step 5: s and Examine Portfolios for a Professional Leather Tooling Course Online
Reviews are the real pulse of a course. Look for patterns, not one‑off comments.
Focus on three things:
- Support speed: Do learners say the instructor answers within a day?
- Project depth: Are the final pieces described as “finished, usable products”?
- Tool kit info: Does the review mention whether a kit was shipped or if you had to buy tools yourself?
Our market research found that only one of six courses ships a tool kit. That means most learners will need to buy tools on their own. If a course does ship a kit, that can be a huge value add.
Check the student portfolios on the course page. Look for clear photos that show the step‑by‑step process, not just the final product. Good portfolios also include close‑ups of tooling marks, which proves the instructor taught the detail work.
The lack of certification is a transparency issue. If a course doesn’t promise a badge, ask the instructor if they can provide a letter of completion for your resume.
Bottom line: Use reviews to confirm support speed, project depth, and whether a tool kit is included.
Step 6: Enroll with Confidence in a Professional Leather Tooling Course Online
Now you’ve done the homework. It’s time to sign up.
Before you click “Enroll”, double‑check the refund policy. A 30‑day money‑back guarantee lets you test the first few lessons risk‑free.
Make sure you have the basic tools ready. A starter kit usually includes a swivel knife, a few stamps, edge paint, and a stitching pony. If the course does not ship a kit, buy the basics from a reputable craft store.
Set up a dedicated workspace. A clean bench, good lighting, and a sturdy chair keep you comfortable for long practice sessions.

Plan your study schedule. Treat the course like a part‑time job: 2‑3 hours a week, with one day for practice and another for review.
Finally, track your progress. Use a simple spreadsheet with columns for date, lesson, tool used, and a quick self‑rating. Over time you’ll see clear improvement.
Bottom line: Follow these steps and you’ll start your professional leather tooling journey with peace of mind.
Frequently Asked Questions
What should I look for in a professional leather tooling course online?
Look for a clear syllabus, a teacher with real trade experience, active student support, and a community forum. Make sure the course matches your skill level and includes project files you can follow. A good course will also list the tools you need and offer a refund window so you can test the first lessons risk‑free.
Do I need to buy a tool kit before I start a professional leather tooling course online?
Most courses expect you to have basic tools like a swivel knife, stamps, and edge paint. Only one of the six courses we studied ships a kit, so plan to buy a starter set yourself. Look for a kit that includes a cutting board, a few common stamps, and a basic stitching pony.
How long does it take to become proficient with leather tooling?
Proficiency varies, but a solid schedule of 2‑3 hours a week for 8‑12 weeks can take you from beginner to confident intermediate. Focus on learning one tool mark per week, then combine marks in a final project. Track your progress in a simple spreadsheet to see improvement over time.
Is a certificate important for a professional leather tooling course online?
While none of the six courses we examined offer a formal certification, a digital badge can still boost your portfolio. Ask the instructor if they can provide a letter of completion. Pair the badge with photos of your finished projects to show skill to potential clients.
Can I learn leather tooling on a budget?
Yes. Start with a basic tool set that costs under $100 and use free video resources for extra tips. Choose a course with a low‑cost trial , CreativiU offers a $1 trial then $7.95 per month. Combine that with community feedback to keep costs low while you learn.
How do I get feedback on my work in a professional leather tooling course online?
Join the course’s forum or Discord group and post clear photos of each step. Ask specific questions like “Is my edge paint even?” or “Should I deepen this stamp?” Most good instructors respond within a day. Pair peer feedback with instructor critiques for the best results.
What if I fall behind the schedule?
Most online platforms let you pause and replay lessons. Use the flexibility to catch up on weekends. If you need extra help, schedule a one‑on‑one Zoom with the instructor or a fellow student. The key is to keep practicing, even if it’s just 15 minutes a day.
Will I need a kiln or furnace for leather projects?
Leather tooling does not require a kiln. You only need a heat source for edge paint, which can be a simple hair dryer or a heat gun. If you plan to add polymer‑based finishes, a small home oven set to the recommended temperature works fine.
Choosing the right professional leather tooling course online takes time, but the payoff is a skill you can turn into a side business or a full‑time craft career. Use the steps in this guide to set clear goals, vet curriculum, check instructor support, compare platforms, s, and finally enroll with confidence. CreativiU offers a flexible, community‑rich option that stands out as the top pick for serious learners.
Ready to start? Visit CreativiU, grab the $1 trial, and begin shaping leather pieces that look and feel professional.
Leave a Reply